Are you searching for an engaging approach to convey your ideas to the public? Are you scouting for an appealing medium that would stand out from traditional content delivery methods, such as making a video or publishing an article? Are you considering using Augmented Reality (AR), but are not sure how to start?
We at Fraunhofer IESE have also stumbled upon these questions in the course of the Pfaff project. In this blog post, we share our experience in using AR and storytelling. We will go through our use case – the development of KLARa, the Kaiserslautern Augmented Reality application (download via Google Play or App Store) – and explain the steps we followed. Additionally we introduce some tips to help you get started. So, if you are looking for inspiration, buckle up and check out our blog post.
Identifying the problem
Did it ever cross your mind how beneficial it is to buy products produced in your region? Ever heard of the term “Regional Value Creation”?
In the course of the Pfaff project at IESE, we identified a need to raise the public’s awareness of the value of contributing to supporting regional goods. However, we have noticed that the concept itself is somewhat vague and hard to grasp. Thus, our main challenge was to transfer the idea in a simplified, easy-to-digest manner in order to not lose the interest of the audience.
Exploring candidate solution concepts
To explore possible solutions, we conducted a creativity workshop in which we collected many ideas. One interesting idea that popped up during our workshop was to utilize the power of storytelling. We just needed to compose a suitable story that would be of an interest to people of different age groups. Another idea was to use Augmented Reality due to its attractive features.
As a result, we agreed on incorporating both of these ideas to develop KLARa: a mobile application that combines AR technology and storytelling to offer an enjoyable experience that catches the users’ attention and encourages them to share it with others.
Realizing the solution (using Augmented Reality/AR and storytelling)
1. Defining the content

The first step we took towards realizing our solution was to write the story. Since bread is a beloved item present on almost every breakfast table, we decided to explain „Regional Value Creation“ by telling the story of a little bun produced in the county of Kaiserslautern, Germany.
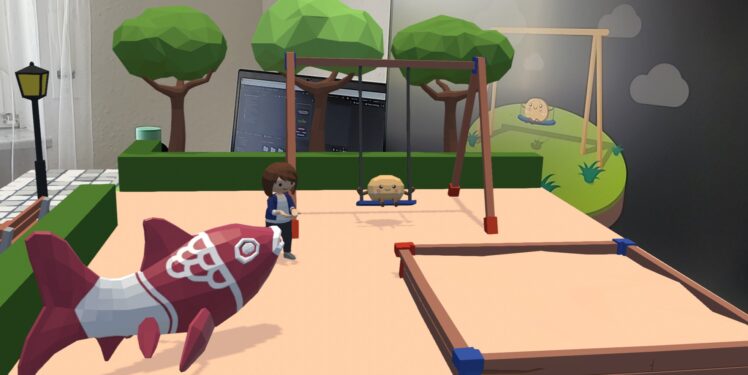
The story has five chapters, each of which takes place at a different location in the county of Kaiserslautern. In the first chapter, which takes place at a playground in Kaiserslautern where the bun is playing on a swing, Klara, the narrator, introduces herself and sets the stage: What is the relationship between the bun and the swing? How did the bun end up on the swing? These are the questions for which Klara will help us get answers later in the story.
Throughout the story, Klara takes us on multiple field trips to visit some of the people involved in the production of the bun and asks them to explain their roles and their contribution to the process. The second chapter takes place at the farm where the wheat seeds are planted. The third chapter takes place at the mill where the flour is produced, while the fourth one is at the bakery where the bun is baked and sold. In each of these chapters, new characters are introduced: Ms. Acker, the farmer; Mr. Müller, the owner of the mill; Mr. Schrauber, the craftsman; Ms. Wagner, the truck driver, and Ms. Korn, the bakery owner. In the final chapter, Klara summarizes the journey we went on during the story and answers the original question: „How did the bun end up on the swing?“
Thus, by the end of the story, we understand how a strong regional economic cycle can be established when people living in a region work, pay taxes, and buy products produced in their region.
2. Designing and creating the assets
After composing the story, we worked on designing the characters and the environments to be used in KLARa, our mobile application.
I. Sketching with pen and paper

Before designing our own assets, we tried to get inspired by pre-existing reference characters and environments, of different styles. This helped us define and agree on a rough idea of what we would like the characters and environments in our story scenes to look like. Based on that, our designer sketched different variants of the characters to help us compare, suggest improvements, and choose the ones most consistent with our vision.
For KLARa, we went for a cartoonish look of the characters. We designed the characters with rounded faces and relatively short bodies, aiming for an adorable look that triggers empathy. Since the aim of KLARa is to explain the importance of buying local goods, authenticity was an essential requirement for us. Thus, we paid extra attention to the details in the environments of the different scenes, e.g., placing the famous colorful fish (the symbol of Kaiserslautern) in the playground scene; designing the mill and the farmhouse in a way that is consistent with the German architectural style; adding the local bread „Pfälzer Landbrot“ to the menu in the bakery; using the map of the county of Kaiserslautern and placing Kaiserslautern’s city hall in the final scene.
Tips to get you started:
- Ask yourself the following questions: What age group is my application intended for? What is more suitable for the application; realistic characters and environments, or cartoonish-looking ones? Look for inspiration from animated movies and mobile games to explore the different possibilities.
- Choose reference environments and characters that are consistent with the content of your story. This will help you design your own.
- Choose appropriate colors for the environments and the characters (clothes, hair, etc.,) and make sure they are coherent when placed together in the same scene.
- Pay attention to details – this will elevate the level of the final result. E.g., if relevant in the context of your application, the user should be able to identify through the environment models where the story is taking place.
- Do not underestimate the power of sketching. Start the ideation with simple pen and paper sketches.
II. Creating the digital 3D models


After agreeing on the final version of our sketches, we mapped them to digital models using low poly art, a digital design form that arranges a low number of 2D polygons in 3D space to form minimalistic shapes. Low poly models are lightweight, require little computational power, and are rendered fast, which makes them suitable for AR applications. We used Blender, a free and open-source 3D creation suite for the modeling (creating FBX models).
III. Creating the animation and recording the audio clips
We created different animations for the characters‘ bodies (e.g., walking, waving, arms movements, etc.,) using Blender. For reasons of simplicity, we excluded face animations. We animated at a frame rate of 24 frames per second (fps). As for the audio recordings of the characters‘ scripts, we got some of our colleagues to record their voices and created the (.wav) audio clips.
To ensure synchronization between the animations and the audio clips, we went through multiple rounds: We first recorded reference audio clips for the scripts of all the characters (one colleague did the recording) to estimate time frames; then our designer used the reference recordings to create the animation in a synchronous manner. Finally, once we were happy with the result, we recorded the official final audio clips.
3. Designing the AR application (user interfaces and user experience)


Before designing KLARa, we explored some existing AR applications to get a better understanding of AR experiences. We collected some insightful tips from Google’s AR Elements application, an AR application specially designed to guide AR application designers and developers when building such applications.
To design KLARa’s user interfaces (UIs), we started by creating low-fidelity pen-and-paper sketches. We then mapped them along with the transitions between them to digital designs using Adobe XD and experimented with different colors and fonts. We agreed on using the color scheme of the Pfaff project. To capture the user’s attention immediately after starting the application, and after asking for camera permission, we decided to use the user’s environment (the rear camera view) as a background for the UIs instead of using static ones. This is to give the user an idea of the theme of the application and intrigue their curiosity. For a smooth user experience, we created a dedicated instructional UI that explains to the user what to expect when the story starts. Furthermore, we also agreed on providing the user with guidance during the instantiation to enable a seamless process.
Before transitioning from one scene to the next, we decided to pause the scene while displaying a „To Next Scene“ button on the screen to allow the user to explore and freely move around the environment.
To enrich the user’s experience, we added some background sounds (e.g., bird sounds in the playground scene, chicken sounds in the farm scene, etc.,). Moreover, by adding subtitles for the characters’ dialog, we provided the possibility to understand and enjoy the story even if the user prefers not turning up the volume.
Tips to get you started:
- Test existing AR applications that are out there to get a better understanding of the special requirements for this type of applications.
- Design a user-friendly onboarding guide to help the user while instantiating the AR experience. The process should be straightforward and seamless to avoid user frustration.
- Do not forget to introduce Data Privacy and Legal Notice UIs. Although this might sound boring, it is very important to provide this information to the user. Furthermore, this is required if you are planning to publish the application in app stores.
- Make your application interactive, when applicable, to engage the user in the experience.
- Use suitable colors for the elements of the UIs. The colors should be consistent with those used for the content of your application.
4. Implementing the AR application
After we created all the building blocks, it was time to bring them together and implement KLARa. For that, we needed to find the right tool that offers suitable features to fulfill our requirements.
I. Setting up the development environment
In our case, it was important for us to use a cross-platform framework to implement the application once and build it for both IOS and Android devices. For that, we used the Unity game engine. Unity offers the AR Foundation framework, “A framework purpose-built for augmented reality development that allows you to build rich experiences once, then deploy across multiple mobile and wearable AR devices”. The AR Foundation package includes interfaces for core features from both Apple’s augmented reality platform for iOS devices (ARKit) and Google’s augmented reality SDK (ARCore). To be able to use those features, we also installed the respective providers‘ plug-in packages for those two platforms (Google ARCore XR Plug-in and Apple ARKit XR Plug-in).
For version control, we used Git and the official gitignore file for Unity projects.
To familiarize ourselves with the capabilities of AR Foundation and the supported features, we checked out the AR Foundation Samples GitHub repository. The repository offers multiple example AR scenes that use AR Foundation to demonstrate its features. Each feature is used in a minimal sample scene with an example code. Furthermore, we checked out the AR Foundation Demos GitHub repository, which offers more advanced examples.
Tips to get you started:
- To get started with Unity, download and install Unity Hub and use it to install the appropriate Unity version you would like to work with. Then create your first „3D project“ and install the required packages.
- Do not forget to install the IDE that you will use to write code for your Unity project (in our case, we used Microsoft Visual Studio and programmed with C#).
- Before using Unity, do not forget to check Unity licenses and your eligibility for the plan of your choice.
- To rapidly test the layout of your application on specific devices with different resolutions and aspect ratios, different layouts for the notches, and curved or beveled edges (e.g., Apple iPad 9th generation, iPhone 13, Google Pixel 7, Samsung Galaxy S20, etc.) and to test the basic interactions, install the Device Simulator package. The Device Simulator simulates the view on different mobile devices. Thus, it allows you to preview how your application will look on a specific device without having to build it and test it on that exact device.
II. Implementing the application’s functionalities
In the following, we will list the main functionalities of KLARa and provide some insights into how we implemented them.
- Plane detection and object placement


To start the AR experience, the user has to navigate their surroundings with the mobile camera to find a horizontal plane on which the first scene can be placed.
For plane detection, along with instructing the user during the process, and the object placement features, we reused code from the OnboardingUX example scene from the Unity-Technologies AR Foundation Demo Projects GitHub repository.
- Playing the story


To play the story scenes, we used Unity’s Timeline: “The Unity Timeline Editor is a built-in tool where you create and edit cinematic content, gameplay sequences, audio sequences, and complex particle effects”. To create a timeline, clips should be added to its tracks; a timeline is composed using multiple tracks. A clip is an action that plays over a certain amount of time.
We played the whole story using a single timeline. To create our timeline, we used the following track types:
-
- Activation Track: a track that allows you to control (activate/deactivate) an object starting at a specific point in time. We used this track to display/hide parts of the story (environments and characters) to navigate through the story scenes.
- Animation Track: a track that enables importing existing animations or creating new ones. We used this track to add our animation clips of the 3D characters.
- Audio Track: a track that enables importing existing audio clips and editing them. We used this track to add the sound clips for the characters and the background sound clips (sound effects).
- Custom Track: a track that enables developers to create their own custom tracks. We created a „Dialogue Custom Track“ to display the subtitle of the dialogs. To do so, we reused code from the „Dialogue“ Custom Track of the demo game A Terrible Kingdom.
- Pausing the story and transitioning to the next scene with a button click

To pause the timeline after each story scene, we used Timeline Signals. A Signal is a specific type of the Marker item that marks an instant in time on a timeline. The Signal feature enables establishing a communication channel between the timeline and the outside systems. At the end of each story scene, we emit our custom „View Next Scene” signal. The Game Manager receives the signal, pauses the timeline, and displays a “Play Next Scene” button on the UI.
- Rating the AR application


After the final scene of the story, KLARa prompts the user via a UI to rate the experience.
To store the user’s feedback, we developed a simple Express.js (Node.js) backend application. The backend application exposes a restful API with an endpoint called by KLARa to post the user’s rating.
III. Polishing the visuals: lighting and postprocessing


As a nice last touch, we enriched the colors and the shadows in the story scenes for a more realistic look. To do so, we experimented with different lighting and postprocessing settings and effects, which made a ton of difference.
Tip: Choose the effects that are appropriate for the performance requirement of your application.
IV. Testing and releasing the AR application
We tested KLARa continuously during the development activity; whenever a new feature was added, we performed a test. Finally, multiple testers tested the final build of KLARa using multiple devices.
Tip: Do not forget to use the Device Simulator for rapid testing each time you add a new feature.
Voilà! Time to publish KLARa in the app stores: We wrote a description of the application, took representative screenshots, and submitted it to the stores for review.
Now that you have read about our experience in utilizing AR and storytelling,
- …would you like to try out KLARa yourself?
KLARa has already been released on both Google Play and App Store and is available for download.
- …have you already tried out KLARa?
We would appreciate it if you gave us your feedback by rating KLARa yourself.
- …intrigued to know more about “Regional Value Creation”?
Follow KLARa’s recommendation to visit the Klara Regionale Wertschöpfung website, where you will find much more information.
- …do you have any questions, comments, or feedback?
We would be happy to hear from you; feel free to get in touch with us.

Check out some more information!
If you would like to know about other solutions we developed in the Pfaff project, have a look at our Pfaff map, our Quartierswerkstatt YouTube channel, or our previous blog articles.
References
[1] AR Foundation, accessed 16 August 2023, https://unity.com/unity/features/arfoundation.
[2] Introduction to Timeline, Unity Learn, accessed 16 August 2023, https://learn.unity.com/tutorial/introduction-to-timeline-2019-3#.